

Most drivers spend hundreds of dollars replacing tires years earlier than they should, and the reason is almost always the same: skipped rotations. After spending years turning wrenches in a shop and rotating thousands of tires on everything from Honda Civics to F-250 work trucks, I can tell you that this 30-minute job is the single most cost-effective thing you can do for your tires.
This guide walks you through exactly how to rotate tires at home, which pattern to use for your specific vehicle, the mistakes that send people back to the tire shop, and the real numbers on what it costs to skip this maintenance.
Quick Answer: To rotate tires, loosen the lug nuts while the vehicle is on the ground, lift the car with a jack and secure it on jack stands, remove the wheels, swap them according to the correct rotation pattern for your drivetrain (forward cross for FWD, rearward cross for RWD/AWD, side-to-side for directional tires), then torque the lug nuts to the manufacturer’s specification in a star pattern. Most vehicles need rotation every 5,000 to 7,500 miles.
But dont worry, this is just the highlights of the article you get everything in detail below, just keep reading.
Why Tire Rotation Actually Matters?
Tires wear unevenly. That’s just physics. The drive wheels handle acceleration torque, the steered wheels scrub through every turn, and the weight distribution of your engine and passengers is never perfectly even. Without rotation, you’ll see the front tires on a front-wheel-drive car wear out roughly twice as fast as the rears.
Regular rotation does three things that directly save you money:
- Extends tire life by 20% to 25% according to data from Tire Rack and major tire manufacturers
- Maintains even traction on all four corners, which matters enormously in rain and snow
- Protects your tire warranty. Most manufacturers (Michelin, Goodyear, Bridgestone, Continental) require documented rotations every 5,000 to 8,000 miles to honor treadwear warranties
Skip rotations and you’re not just losing tread. You’re voiding the warranty that came with a $1,200 set of tires.
How Often Should You Rotate Tires?
The widely accepted answer is every 5,000 to 7,500 miles, or roughly every other oil change. But the right interval depends on your vehicle and driving style.
Tire Rotation Interval Chart by Vehicle Type
| Vehicle Type | Recommended Interval | Notes |
|---|---|---|
| Sedans (FWD) | 5,000 to 7,500 miles | Front tires wear faster, rotate on the shorter end |
| Sedans (RWD) | 6,000 to 8,000 miles | More even wear, longer interval acceptable |
| SUVs / Crossovers (AWD) | 3,000 to 5,000 miles | AWD systems are sensitive to tread mismatch |
| Pickup Trucks (4WD) | 5,000 to 7,500 miles | Heavier loads accelerate wear, especially when towing |
| Electric Vehicles | 5,000 to 7,000 miles | Instant torque wears drive tires faster |
| Performance Cars | 3,000 to 5,000 miles | Soft compounds wear quickly under aggressive driving |
| Sports Cars (staggered) | Side-to-side only | Cannot do front-to-rear rotation |
Check your owner’s manual first. Subaru, for example, is famously strict about AWD tire rotation because uneven tread depth can damage the center differential. A difference of just 2/32″ of tread between tires on a Subaru can cost you a $3,000 transfer case.
Also Read: How Long Does It Take to Change Tires?
Tools You Need to Rotate Tires at Home
You don’t need a professional shop setup, but the right tools make this safer and faster.
Tools Needed for Tire Rotation
| Tool | Purpose | Approximate Cost |
|---|---|---|
| Hydraulic floor jack (2-ton minimum) | Lifting the vehicle | $80 to $200 |
| Jack stands (pair, 3-ton rated) | Supporting the vehicle safely | $40 to $80 |
| Lug wrench or breaker bar | Loosening lug nuts | $20 to $50 |
| Torque wrench (1/2″ drive, 25-250 ft-lb range) | Tightening to spec | $50 to $150 |
| Wheel chocks | Preventing roll | $15 to $30 |
| Tire pressure gauge | Checking PSI after rotation | $10 to $25 |
| Penetrating oil (PB Blaster, Liquid Wrench) | Loosening stuck lug nuts | $8 to $12 |
| Chalk or tire crayon | Marking tire positions | $5 |
The torque wrench is the one tool people skip and shouldn’t. Over-tightening with an impact gun warps brake rotors and stretches studs. Under-tightening lets wheels back off. A $60 click-type torque wrench pays for itself the first time it saves you from warped rotors.
Don’t have the tools or time to rotate your tires safely? Our team at MG Towing & Recovery provides fast roadside tire services, flat tire assistance, and emergency help throughout Milwaukee, Oak Creek, Caledonia, Racine, and nearby Wisconsin areas. Call now for quick, professional service 24/7. 414-973-1902
Safety Precautions Before You Start
I’ve seen too many shade-tree mistakes turn into ER visits. Read this section twice.
- Park on solid, level ground. Concrete driveways or garage floors only. Never asphalt on a hot day. Never gravel or dirt.
- Engage the parking brake and put the transmission in Park (automatic) or first gear (manual).
- Chock the wheels that stay on the ground. If you’re lifting the front, chock the rear wheels front and back.
- Never get under a vehicle supported only by a jack. Hydraulic jacks fail. Use jack stands every time, no exceptions.
- Lift at the manufacturer’s designated jack points. These are reinforced sections of the frame or pinch welds. Your owner’s manual shows their exact location.
- Loosen lug nuts before lifting, while the tire still has weight on it. Trying to break loose lug nuts on a wheel that’s in the air will spin the wheel and possibly knock the car off the jack.
How to Rotate Tires: Step-by-Step Process
Here’s the full procedure I use, whether I’m working on a customer’s car or my own truck.
Step 1: Gather Tools and Prep the Vehicle
Pull the car into your garage or driveway. Let the brakes cool for at least 30 minutes if you’ve been driving. Hot brake rotors don’t like sudden temperature changes from concrete contact.
Step 2: Check Tire Pressure and Tread First
Before you touch a lug nut, walk around the car and check pressure on all four tires (when cold). Note any tire that’s significantly low. Use the penny test or a tread depth gauge to measure each tire. A new tire has 10/32″ of tread. Replace at 2/32″. If one tire is dramatically more worn than the others, that’s a sign of an alignment problem, not just rotation neglect.
Step 3: Mark the Tires
Use chalk or a tire crayon to mark each tire’s current position. Write “LF” (left front), “RF,” “LR,” “RR” on the sidewall. This prevents the most common DIY mistake: putting a tire back where it started.
Step 4: Loosen the Lug Nuts
With the tires still on the ground, break each lug nut loose by about a half-turn. Don’t remove them yet. Turn counter-clockwise. If a lug nut won’t budge, hit it with penetrating oil and wait 10 minutes. Never use a cheater bar (extension pipe) on a torque wrench. You will destroy the wrench.
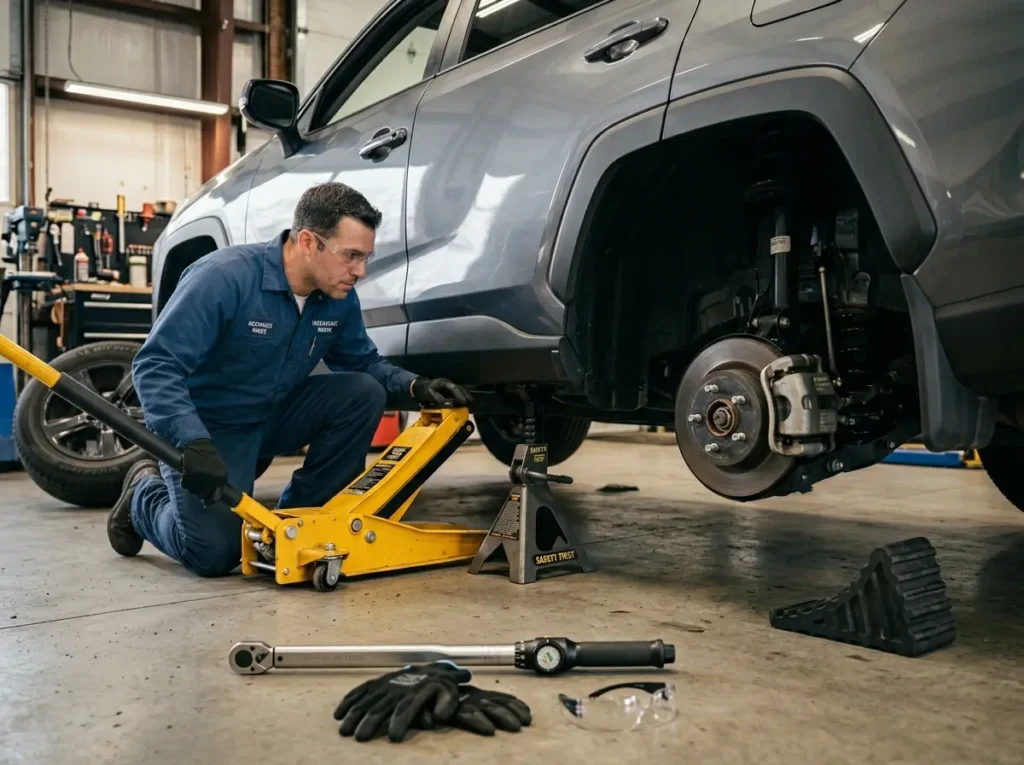
Step 5: Lift the Vehicle
Place your floor jack at the designated front jack point and lift one corner of the vehicle. Once it’s high enough, slide a jack stand into position under the proper support point and slowly lower the jack onto the stand. Repeat for the other three corners, or do two at a time if your jack and stands allow.
Some people prefer to do the front pair first, rotate those, then the rear pair. This works fine and uses less equipment. Just make sure the wheels still on the ground are chocked.
Step 6: Remove the Wheels
Finish unscrewing the lug nuts (keep them in a tray, sorted by wheel so you don’t mix them up). Pull each wheel straight off. If a wheel is stuck to the hub from corrosion, kick the back side of the tire with the side of your foot. Don’t hammer the wheel.
Step 7: Inspect Brakes, Hubs, and Tires
This is the bonus benefit of DIY rotation. With the wheels off, you can see your brake pads, rotors, and the inner sidewall of each tire. Look for:
- Brake pads under 3mm (replace soon)
- Scored, grooved, or rusted rotors
- Bulges, cracks, or cuts in the tire sidewall
- Uneven wear patterns like cupping, feathering, or one-sided wear
- Brake fluid leaks around the caliper
Take 30 seconds to wipe the hub face with a wire brush. Rust and debris on the hub cause vibration and uneven seating.
Step 8: Install Tires in the Correct Rotation Pattern
This is where you need to know your drivetrain. See the next section for the right pattern.
Step 9: Hand-Thread Every Lug Nut
Start each lug nut by hand to avoid cross-threading. Cross-threaded studs are an expensive repair. Once they’re all hand-tight, snug them down with the wrench in a star (criss-cross) pattern, not in a circle. Star pattern ensures the wheel sits flat against the hub.
Step 10: Lower the Vehicle
Raise the jack slightly, remove the jack stand, and lower the vehicle until the tire just touches the ground (carrying enough weight that it won’t spin).
Step 11: Torque to Specification
Set your torque wrench to the manufacturer’s spec. Tighten each lug nut in a star pattern until you hear or feel the click. Then do a second pass to confirm.
Torque Specification Examples for Common Vehicle Categories
| Vehicle Category | Typical Torque Spec | Examples |
|---|---|---|
| Compact sedans | 80 to 90 ft-lb | Honda Civic, Toyota Corolla, Mazda 3 |
| Midsize sedans | 80 to 100 ft-lb | Toyota Camry, Honda Accord, Nissan Altima |
| Compact SUVs | 80 to 100 ft-lb | Honda CR-V, Toyota RAV4, Mazda CX-5 |
| Midsize SUVs | 100 to 125 ft-lb | Ford Explorer, Toyota Highlander, Jeep Grand Cherokee |
| Half-ton pickups | 140 to 150 ft-lb | Ford F-150, Chevy Silverado 1500, Ram 1500 |
| Heavy-duty pickups | 165 to 185 ft-lb | Ford F-250/350, Chevy 2500/3500, Ram 2500/3500 |
| Performance / European | 90 to 120 ft-lb | BMW, Audi, Mercedes (always check manual) |
Always verify with your owner’s manual or door jamb sticker. These are general ranges, not gospel.
Step 12: Lower Fully and Re-Check After 50 Miles
Lower the car completely off the stands. After driving 50 to 100 miles, re-check the torque on all lug nuts. Wheels can settle slightly after installation, and this final check is what shops sometimes skip.
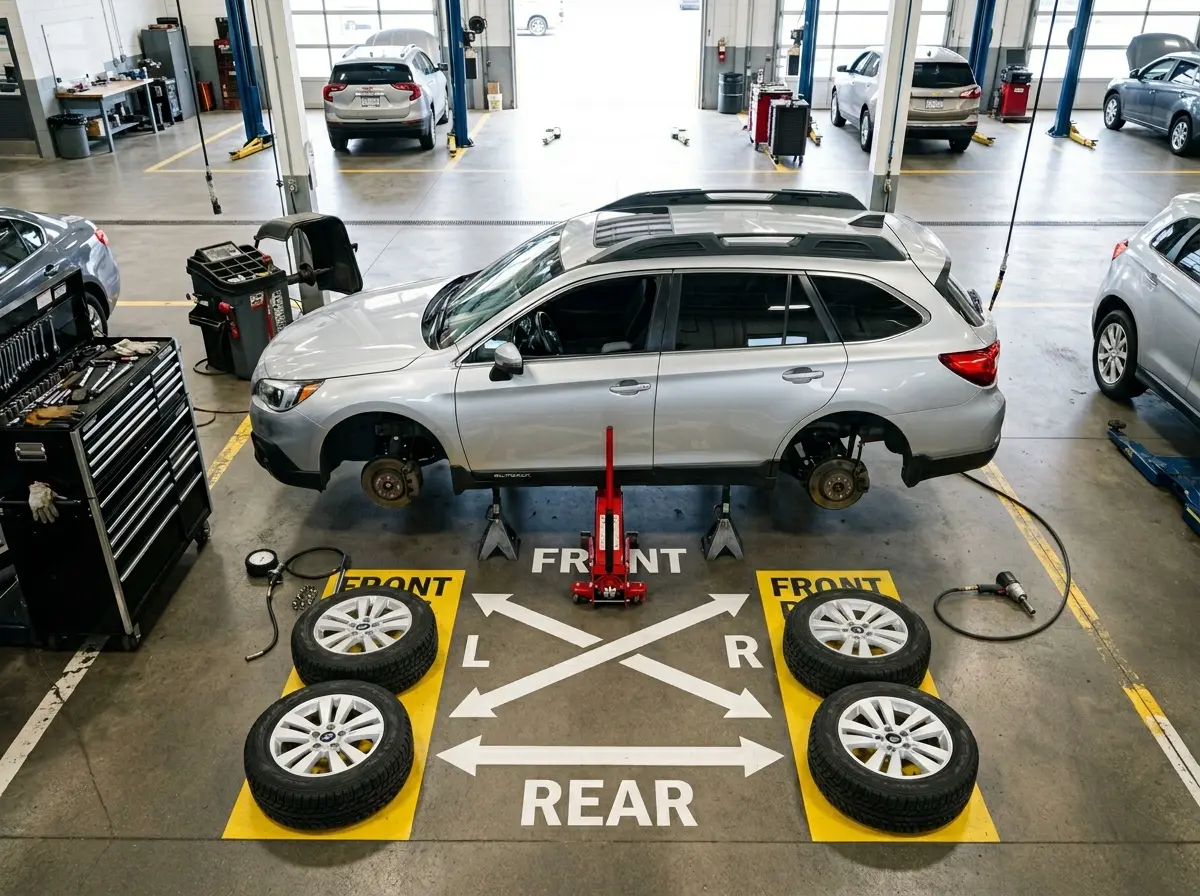
Tire Rotation Patterns Explained
The rotation pattern depends on two things: your drivetrain and whether your tires are directional.
Tire Rotation Pattern Comparison Table
| Drivetrain | Pattern Name | How It Works |
|---|---|---|
| Front-Wheel Drive (FWD) | Forward Cross | Front tires move straight back. Rear tires cross to the opposite front corners. |
| Rear-Wheel Drive (RWD) | Rearward Cross | Rear tires move straight forward. Front tires cross to opposite rear corners. |
| All-Wheel Drive (AWD) | Rearward Cross or X-Pattern | Same as RWD, or all four tires move diagonally. |
| 4WD Trucks | Rearward Cross | Same as RWD pattern. |
| Directional Tires | Side-to-Side (same axle) | Tires can only stay on their original side or be remounted. |
| Staggered (different front/rear sizes) | Side-to-Side | Front pair swap, rear pair swap. No front-to-rear. |
| Performance with directional + staggered | None possible | Cannot be rotated. |
1. Front-Wheel Drive Tire Rotation (Forward Cross)
On a FWD car like a Toyota Camry or Honda Civic, the front tires do all the work: powering the car, braking, and steering. They wear out almost twice as fast as the rears.
Pattern:
- Left front goes to left rear
- Right front goes to right rear
- Left rear crosses to right front
- Right rear crosses to left front
2. Rear-Wheel Drive Tire Rotation (Rearward Cross)
On a RWD vehicle like a Ford Mustang or older BMW 3 Series, the rear tires handle power delivery and the fronts handle steering. Wear is more balanced.
Pattern:
- Left rear goes to left front
- Right rear goes to right front
- Left front crosses to right rear
- Right front crosses to left rear
3. AWD Tire Rotation
AWD vehicles like Subaru Outbacks, Audi Quattros, and Toyota RAV4 AWDs wear all four tires roughly evenly, but they’re the most sensitive to tread mismatch. Use the rearward cross pattern or an X-pattern (all four tires move diagonally).
Critical AWD note: Replace tires in sets of four. Mismatched tread depth (more than 2/32″ difference) can damage the center differential or viscous coupling on AWD systems.
4. Directional Tire Rotation
Directional tires have a tread pattern designed to rotate in one direction only. You’ll see an arrow on the sidewall. These tires can only be rotated front-to-back on the same side of the vehicle.
- Left front swaps with left rear
- Right front swaps with right rear
If you want to switch directional tires across the vehicle, they have to be dismounted and remounted on the wheel, which usually isn’t worth the labor cost.
Vehicle-Specific Considerations
1. Electric Vehicles (Tesla, Rivian, Ford Lightning, Chevy Bolt)
EVs are heavy and produce instant torque, which chews through tires faster than equivalent gas vehicles. Tesla recommends rotation every 6,250 miles for the Model 3 and Model Y. The Ford F-150 Lightning weighs about 1,600 pounds more than the gas F-150, and its tires reflect that.
Plan to rotate EV tires every 5,000 to 7,000 miles, and expect tire life to be 15% to 20% shorter than on a comparable gas vehicle.
2. Pickup Trucks
If you tow or haul, rotate on the shorter end of the interval (every 5,000 miles). Rear tires under load wear differently than unloaded ones. Trucks with dual rear wheels (dually setups) follow a six-tire rotation pattern that includes both outer and inner rear positions.
3. Performance and Sports Cars
Many performance cars use staggered setups (wider rear tires than fronts). On a Corvette, BMW M3, or Porsche 911, you cannot rotate front-to-rear. The tires are different sizes. You can only swap side-to-side, and only if the tires aren’t directional.
4. Spare Tire Rotation (Full-Size Spares Only)
If your vehicle came with a full-size matching spare (some trucks and older SUVs), you can include it in a five-tire rotation. This extends the life of all five tires by 25%. Do not include compact “donut” spares. They are not designed for regular driving.
Also Discover: What Is a Run-Flat Tire? A Roadside Pro’s Complete Guide
Common Mistakes to Avoid
After years of cleaning up after DIY jobs gone wrong, these are the mistakes I see over and over.
- Using an impact gun without a torque wrench. Always finish with a torque wrench. Impact guns easily over-torque.
- Mixing up the rotation pattern. Using a forward-cross on a RWD vehicle puts the wrong tires in the wrong positions. Mark your tires first.
- Forgetting to check tire pressure after rotation. Different positions sometimes require different PSI on the same vehicle. Check the door jamb sticker.
- Reusing rusted or damaged lug nuts. If a lug nut is corroded or the seat is damaged, replace it. They’re a few dollars each.
- Skipping the wheel hub cleanup. Rust between the hub face and wheel causes vibration that mimics balance issues.
- Not re-checking torque after 50 miles. Wheels settle. Check them again.
- Rotating directional tires across the vehicle. They’ll spin the wrong direction and lose grip, especially in rain.
- Forgetting to reset the TPMS. Some vehicles need a TPMS reset procedure after rotation so the system learns the new positions.
Signs Your Tires Need Rotation Right Now
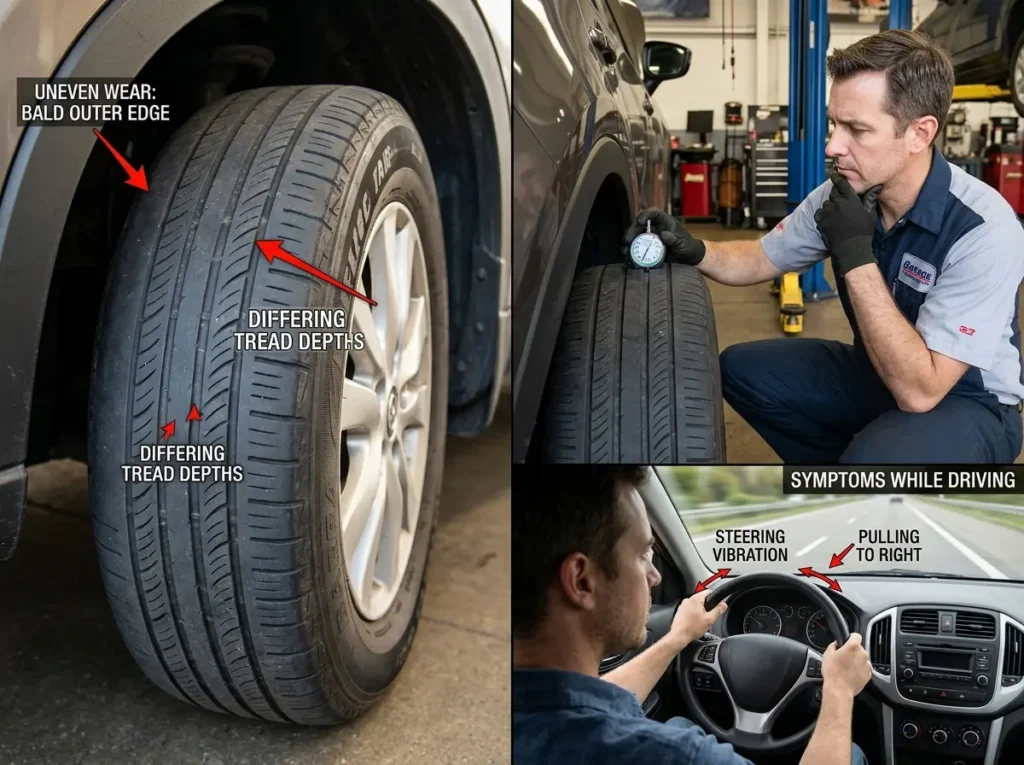
Tire Wear Symptoms and Causes
| Symptom | Likely Cause | Action Needed |
|---|---|---|
| Uneven tread depth front to rear | Overdue rotation | Rotate immediately |
| Cupping or scalloping | Worn shocks/struts or unbalanced tires | Inspect suspension, balance, rotate |
| Inner or outer edge wear | Alignment out of spec | Alignment service, then rotate |
| Center tread worn | Over-inflation | Correct pressure, rotate |
| Both edges worn, center fine | Under-inflation | Correct pressure, rotate |
| Feathering (one side higher than other) | Toe alignment off | Alignment, then rotate |
| Vibration at highway speed | Out of balance or uneven wear | Balance and rotate |
| Pulling to one side | Uneven wear or alignment issue | Diagnose alignment, rotate |
If you notice noise from your tires that wasn’t there before (a humming or growling that gets louder with speed), that’s often uneven wear creating an irregular tread surface. Rotation can help if caught early. Once the pattern is set into the rubber, no rotation will fix it.
Professional Mechanic Tips
A few things I’ve picked up that aren’t in the manuals:
- Anti-seize on the hub face, not on the studs. A light film of anti-seize on the flat surface where the wheel meets the hub prevents corrosion welding. Never put anti-seize on the threads. It changes the torque values and can cause the lug nuts to loosen.
- Buy the right socket. Use a six-point socket on lug nuts, not a twelve-point. Twelve-point sockets round off rusted lug nuts. The right size matters too. A 19mm on a 21mm lug nut will strip it.
- Pay attention to wheel weights. If you see lots of stick-on weights coming loose or missing, the wheel is out of balance. Rotation alone won’t fix that.
- Check brake hardware too. Caliper slide pins seize up over time. Push the caliper piston back gently and make sure it moves freely.
- Document everything. Keep a maintenance log with date, mileage, and which tire went where. This protects your warranty and helps diagnose future wear patterns.
Key Takeaway: A proper tire rotation isn’t just a swap. It’s a 30-minute inspection of your suspension, brakes, and tires that catches expensive problems early.
DIY vs Professional Tire Rotation Cost Comparison
| Method | Cost | Time Invested | Notes |
|---|---|---|---|
| DIY (tools you already own) | $0 per rotation | 30 to 45 minutes | Lowest cost if you have the equipment |
| DIY (first-time tool purchase) | $200 to $400 one-time, then free | 45 to 60 minutes first time | Pays for itself within 4 to 6 rotations |
| Independent tire shop | $20 to $40 per rotation | 15 to 30 minutes wait | Often free with tires purchased there |
| Dealership service | $30 to $60 per rotation | 45 to 90 minutes wait | Includes multi-point inspection |
| Costco / Sam’s Club | Free with tire purchase | 30 to 60 minutes wait | Members only, limited to their tires |
| Discount Tire / Tire Rack installer | Free with tire purchase | 20 to 45 minutes wait | Lifetime free rotations on tires bought there |
Real-world math: Over the 60,000-mile life of a tire set, you’ll need about 10 rotations. At $30 per rotation, that’s $300. Doing it yourself pays for the tools within two to three years.
If you bought your tires from Discount Tire, Costco, or another shop offering free lifetime rotations, just use that. It’s free, and they’ll catch other issues at the same time.
FAQs: Tire Rotation Questions Answered
Q. How often should you rotate tires?
Most vehicles need tire rotation every 5,000 to 7,500 miles, which works out to roughly every other oil change. AWD vehicles and performance cars need more frequent rotations, typically every 3,000 to 5,000 miles. Always defer to your owner’s manual if it specifies a different interval.
Q. Do electric vehicles need tire rotation?
Yes, and more often than gas vehicles. EVs are heavier and produce instant torque, both of which accelerate tire wear. Tesla recommends rotation every 6,250 miles. Most other EV manufacturers recommend every 5,000 to 7,000 miles. Skipping rotations on an EV can shorten tire life by 25% or more.
Q. Can you rotate directional tires?
Directional tires can only be rotated front-to-back on the same side of the vehicle. The arrow on the sidewall indicates rotation direction. To swap a directional tire to the opposite side, the tire must be dismounted from the wheel and remounted, which usually isn’t cost-effective. Stick to same-side front-to-rear rotation.
Q. What happens if you never rotate tires?
Tires will wear unevenly, with the drive wheels wearing out 30% to 50% faster than the others. You’ll need to replace tires sooner (sometimes by 15,000 to 20,000 miles), the warranty may be voided, and the vehicle will have reduced traction and handling, especially in wet conditions. Uneven wear also causes vibration, noise, and steering pull.
Q. Should tires be balanced during rotation?
Not every time, but balance any tire that shows vibration symptoms or has new wear patterns. A typical recommendation is to balance tires every 12,000 to 15,000 miles, or any time a tire is dismounted from the wheel. If your steering wheel shakes at highway speeds after a rotation, get them balanced immediately.
Final Thoughts and Next Steps
Tire rotation is the cheapest insurance policy you can buy for your tires. Whether you do it yourself or have a shop handle it, the important thing is doing it on schedule. Set a reminder every other oil change and stick to it.
If you bought your tires somewhere offering free lifetime rotations (Discount Tire, Costco, Tire Rack installers), there’s no reason not to use that service. If you didn’t, the DIY route pays for the tools in just a few rotations.
Your next steps:
- Check your owner’s manual for the rotation interval and pattern
- Find your torque specification (door jamb sticker or manual)
- Schedule your next rotation, or do it this weekend
- Set a recurring reminder every 5,000 to 7,500 miles
Take 45 minutes this Saturday and get it done. Your tires (and your wallet) will thank you somewhere around the 70,000-mile mark when you’re still riding on the original set.
